[gallery]
A recipe from Taste of Home's Simple and Delicious December 2008 issue.
3/4 pound boneless skinless chicken breasts, cut into 1/2-inch cubes
1/4 pound, smoked kielbasa or Polish sausage, cut into 1/4-inch slices
1/2 c. chopped onion
1 tb. olive oil
3 c. frozen chopped broccoli, thawed
1 can (14oz) coconut milk
1 can (10-3/4oz) condensed cream of celery soup, undiluted
1 c. uncooked instant rice
1/3 c. water
1 tb. curry powder
1/4 tsp. salt
1 medium tomato, chopped
In a large skillet, saute the chicken, kielbasa and onion in oil until chicken juices run clear. Add the broccoli, coconut milk, soup, rice, water, curry and salt.
Bring to a boil. Reduce heat; cover and simmer for 10-15 minutes or until rice is tender. Garnish with tomato. Yield: 4 servings
The only change I made was I used ham sausage because I couldn't find any kielbasa. It was very good! Hubby and I both loved it and the kids ate it so that's a plus.I'll definitely make this recipe again. Oh and it was supper easy and fast.
Saturday, November 15, 2008
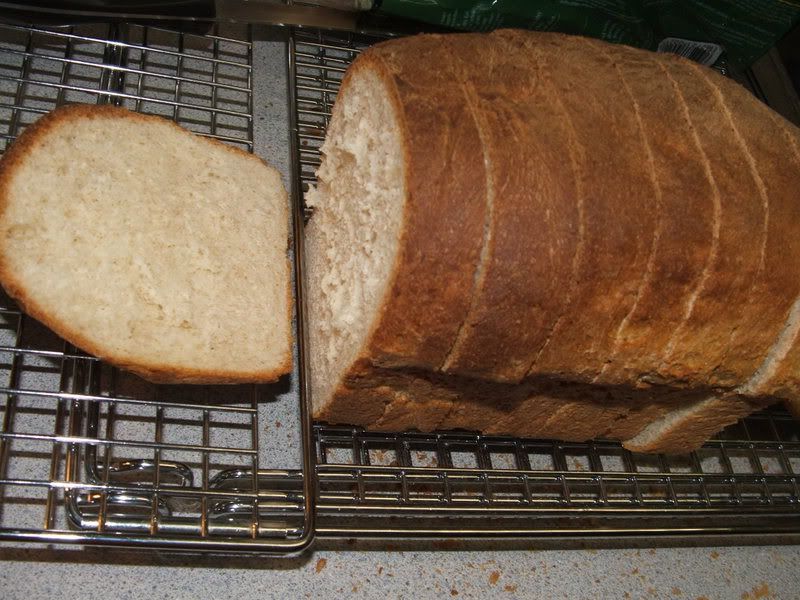
Amish Friendship Bread
A friend gave me a starter and found the instructions here after she was given it without instructions. I made one batch to make other starters and kept one. So I've made two batches of this bread and it's is so very good.
Do not use any type of metal spoon or bowl for mixing. If you don't already have them, this is a good excuse to add a wooden bowl and a wooden spoon to your stock of kitchen utensils.
Do not refrigerate. Below room-temperatures will retard yeast growth, perhaps even kill the yeast.
If air gets into the bag, let it out. Some "air" which will inflate the bag (if the yeast is growing properly) is really carbon dioxide, a natural by-product of yeast growth (also known as "fermentation"). So this "air" is perfectly normal and, indeed, should accumulate. That is, you should see bubbles forming in the mixture if the yeast is growing properly. Let this carbon dioxide out of the bag as needed to prevent the bag from over-inflating. At the same time, keep the bag closed otherwise to prevent ambient air from the room from coming into contact with the yeast mixture.
Below, where the instructions say "mush the bag", this simply means that you should squeeze and massage the yeast mixture through the bag, in effect, to stir it up.
If you keep a starter for yourself, you will be baking every ten days. Only the Amish know how to create the starter yeast, so if you give all of yours away, you'll have to wait until someone gives one back to you. On the other hand, if you don't give any away, then you won't have anyone to go to if you lose yours. In any event, you can always find the bread recipe here.
Starter
The starter is easy. Combine 1/4 cup warm water with a package of dry yeast. When it begins to bubble add 1 cup flour, 1 cup sugar and 1 cup milk. This is Day 1.
General Guidelines
Do not use any type of metal spoon or bowl for mixing. If you don't already have them, this is a good excuse to add a wooden bowl and a wooden spoon to your stock of kitchen utensils.
Do not refrigerate. Below room-temperatures will retard yeast growth, perhaps even kill the yeast.
If air gets into the bag, let it out. Some "air" which will inflate the bag (if the yeast is growing properly) is really carbon dioxide, a natural by-product of yeast growth (also known as "fermentation"). So this "air" is perfectly normal and, indeed, should accumulate. That is, you should see bubbles forming in the mixture if the yeast is growing properly. Let this carbon dioxide out of the bag as needed to prevent the bag from over-inflating. At the same time, keep the bag closed otherwise to prevent ambient air from the room from coming into contact with the yeast mixture.
Below, where the instructions say "mush the bag", this simply means that you should squeeze and massage the yeast mixture through the bag, in effect, to stir it up.
Instructions
- Day 1: This is the date on the bag. You don't need to do anything this day other than put the bag in a place of moderate (room) temperature and where you'll notice it tomorrow and succeeding days.
- Day 2: Mush the bag.
- Day 3: Mush the bag.
- Day 4: Mush the bag.
- Day 5: Mush the bag.
- Day 6: Add to the bag 1 cup flour, 1 cup sugar, 1 cup milk, then mush the bag.
- Day 7: Mush the bag.
- Day 8: Mush the bag.
- Day 9: Mush the bag.
- Day 10: Baking day. Follow the instructions below:
- Pour the contents of the bag into a non-metal bowl.
- Add 1½ cups flour, 1½ cups sugar, and 1½ milk.
- Measure out 4 separate batters of 1 cup each into 4 1-gallon Ziploc™ bags. Keep a yeast starter for yourself (if you choose) and give the other 3 along with copies of this recipe to friends. Write today's date on each bag so your friends will know what to designate as Day 1.
- Preheat the oven to 325°.
- To the remaining yeast mixture in the bowl add the following:
- 3 eggs
- 1 cup oil
- ½ cup milk
- 1 cup sugar
- 2 tsp. cinnamon
- ½ tsp. vanilla
- 1½ tsp. baking powder
- ½ tsp. baking soda
- ½ tsp. salt
- 2 cups flour (sifted if you wish)
- 1 large box of instant vanilla pudding
- Grease or oil 2 large loaf pans.
- Mix an additional ½ cup sugar and 1½ tsp. cinnamon. Dust the greased pan with half of this mixture.
- Pour the batter evenly into 2 pans and sprinkle the remaining cinnamon-sugar mixture over the top.
- Bake one hour.
- Allow the loaves to cool (about 10 minutes) until they loosen easily from the pans. Turn onto a serving dish.
If you keep a starter for yourself, you will be baking every ten days. Only the Amish know how to create the starter yeast, so if you give all of yours away, you'll have to wait until someone gives one back to you. On the other hand, if you don't give any away, then you won't have anyone to go to if you lose yours. In any event, you can always find the bread recipe here.
Starter
The starter is easy. Combine 1/4 cup warm water with a package of dry yeast. When it begins to bubble add 1 cup flour, 1 cup sugar and 1 cup milk. This is Day 1.
Thursday, October 30, 2008
Freezer Cooking
Our freezer came in last week. I'm very excited to get it. We have more room for food. A friend of our is giving us some moose and caribou and believe it or not I'm excited to experiment with it this winter.
On Monday I was home with some sick kids, so I did a big of batch cooking. I made some of the Ham and Pasta Bake, I took one of the big packages of hamburger to make meatballs, spaghetti sauce and just some friend up meat with garlic, onions and celery and a marinade for the pork chops. It all went into the freezer except for one batch of Ham and Pasta bake which we had for supper the next night.
That night we had BBQ steaks.
Okay I was sure that I had posted the Ham and Pasta Bake but I can't find it to link it so I will post it here.
Ham and Pasta Bake (from Company's Coming)
2 cups elbow macaroni
3 qts boiling water
1 tbs. cooking oil
2 tsp. salt
1/4 c. all-purpose flour
1 tsp. salt
1/8tsp. pepper
1/2 tsp. dry mustard
1 tbs. onion flakes
2 1/2 cups milk
10 oz. frozen chopped broccoli
Boiling water, to cover
2 cups diced or cubed cooked ham
3/4 cup grated medium or sharp cheddar cheese
Topping:
2 tbs. hard margarine (or butter)
1/2 cup. fiend dry bread crumbs
Cook macaroni in first amount of boiling water, cooking oil and salt in a large, uncovered, saucepan for 5 to 7 minutes until tender but firm. Drain.
Combine flour, salt, pepper, dry mustard and onion flakes in medium saucepan. Gradually mix in milk so no lumps remain. Heat and stir until boiling and thickened.
Cook broccoli in second amount of boiling water until tender-crisp. Drain. Add to sauce. Stir in macaroni.
Add ham and cheese. Stir. Turn into ungreased 2 quart(2L) casserole dish.
Topping: Melt margarine in saucepan. Stir in bread crumbs. Sprinkle over all. Bake in 350°F oven for about 30 minutes until browned. Serves 6.
You can freeze this recipe. I just put it in a large Ziploc bag, took out all the air and flattened it out. I really like this recipe, it's easy and versatile because you can use other frozen vegetable and give it to new moms after they come home from the hospital.
Marinade for Pork Chops (from 30 Day Gourmet)
6-8 pork chops
16 oz. pineapple juice
1/2 c. soy sauce
1 t. ginger, ground
1/2 t. garlic, minced
1/3c. Italian dressing
Combine all marinade ingredients. Place meat in freezer bags or containers. Pour marinade over meat. (Each meal makes approximately 3 cups.)
Label, seal and freeze. To serve: Thaw. Grill, broil or pan fry post chops until browned on both sides and no longer pink in the center. Discard marinade.
Meatballs
Master Meat Mix from 30 Day Gourmet
1-1/2lb. beef, pork, Turkey ground (any 1 or a mixture)
2/3c. dry oats or cooked brown rice
1/2c. onion, diced
1 t. salt
1/2 t. garlic powder
2 eggs
2/3c. ketchup
Directions: Mix all ingredients very well with your hands (you may want to wear rubber or disposable gloves) in a large bowl. We have used big storage containers to do this when making a large quantity. We use this mixture primarily for meatloaf and meatballs.
Make meatballs about the size of a large walnut. (I used my ice cream scooper.) Place on an oiled cookie sheet. Bake at 375°F for 20-30 minutes until lightly browned and no longer pink in the center. Cool.
Place meatballs in a freezer bag or container. Seal, label and freeze.
To serve, thaw meatballs and bake at 350°F for 10-20 minutes until hot.
I only did a small batch of this and we tasted some and it was good.
Tuesday, October 07, 2008
High Bush Cranberry Jelly
Some time in August I found a berry bush by my hubby's favorite fishing spot and picked a 4 litre bucket full of the bitter berries while my hubby and oldest son were fishing. Our middle boy had given up fishing and was helping me pick and then the oldest went back and forth a couple of times to to help. So I got this huge bucket of berries to work with.
This is the recipe that I found. I found it after doing a Google search and it brought me to Mother Earth News website, a site and magazine I just love for their ideas. It proved to be a pretty simple task. Thought I had to figure out what 1/2 bottle of liquid pectin was since my package come with two packets and not a bottle, so I did more internet searching and found out that 1 packet is equal to 1/2 the bottle. So that is what I use, 1 packet for this whole recipe. I did used the whole bucket and ended up with two amounts of 5 cups, so I froze the other 5 cups and used one of them 5 cups to make this recipe. And it worked it took a day to really set to a jelly and I was kind of scared I'd just end up with a syrup like the last batch but it took. The syrup by the way is great on pancakes and ice cream.
4 pounds berries
2 cups water
7 cups sugar
Crush berries thoroughly in water with a potato masher and boil. Simmer for 10 minutes. Pour mixture carefully into jelly bag or cheesecloth, hang and drain. Do not squeeze the bag: It will make the jelly cloudy. (You can squeeze the extra juice out later and use it to make cranberry juice or spritzers.) Let the bag hang for several hours or until juice stops dripping. Measure out 5 cups juice. Mix with the sugar in a saucepan.
Depending on how many partially ripe berries you have, adjust your pectin accordingly. An average batch uses a half bottle of liquid pectin or one 1.33 ounce package of powdered pectin. Bring juices to a rolling boil, stirring constantly. Quickly add pectin all at once. Bring mixture back to a rolling boil and boil hard for one minute, stirring constantly. Remove from heat and skim off the foam. Pour into clean, hot jars and process for canning. Makes 8 cups.
[gallery]
I had to throw one in of my oldest and the fish, he caught two that day. His very first time catching fish.
This is the recipe that I found. I found it after doing a Google search and it brought me to Mother Earth News website, a site and magazine I just love for their ideas. It proved to be a pretty simple task. Thought I had to figure out what 1/2 bottle of liquid pectin was since my package come with two packets and not a bottle, so I did more internet searching and found out that 1 packet is equal to 1/2 the bottle. So that is what I use, 1 packet for this whole recipe. I did used the whole bucket and ended up with two amounts of 5 cups, so I froze the other 5 cups and used one of them 5 cups to make this recipe. And it worked it took a day to really set to a jelly and I was kind of scared I'd just end up with a syrup like the last batch but it took. The syrup by the way is great on pancakes and ice cream.
High-Bush Cranberry Jelly
4 pounds berries
2 cups water
7 cups sugar
Crush berries thoroughly in water with a potato masher and boil. Simmer for 10 minutes. Pour mixture carefully into jelly bag or cheesecloth, hang and drain. Do not squeeze the bag: It will make the jelly cloudy. (You can squeeze the extra juice out later and use it to make cranberry juice or spritzers.) Let the bag hang for several hours or until juice stops dripping. Measure out 5 cups juice. Mix with the sugar in a saucepan.
Depending on how many partially ripe berries you have, adjust your pectin accordingly. An average batch uses a half bottle of liquid pectin or one 1.33 ounce package of powdered pectin. Bring juices to a rolling boil, stirring constantly. Quickly add pectin all at once. Bring mixture back to a rolling boil and boil hard for one minute, stirring constantly. Remove from heat and skim off the foam. Pour into clean, hot jars and process for canning. Makes 8 cups.
[gallery]
I had to throw one in of my oldest and the fish, he caught two that day. His very first time catching fish.
Thursday, October 02, 2008
Chicken/Turkey Pot pie
1 tb. oil
1 lb. skinless, boneless chicken breast halves, cubed
1 c. chopped onion
1 (15oz) can green beans
1 tsp. onion salt
1 tb. white sugar
1/4 tsp. garlic powder
1/4tsp. black pepper
1/4 tsp. dried oregano
1 (10.75oz) can condensed cream of chicken soup
Pastry:
2 c. all purpose flour
3/4 c. shortening 1/4 butter
1/4 c. cold water
1 tsp. sugar
1/2 tsp. salt
1. Preheat oven to 400°F.
2. In a large bowl, combine flour, sugar & salt. Cut in shortening and butter with a fork until mixture resembles coarse crumbs. Sprinkle cold water and sitr until it forms a ball. Divide dough in half and shape into balls. Roll one ball out to fit a 9 or 10 in pie plate. Place bottom crust in pie plate and roll out top crust.
3. In a large cast iron frying pan, heat 1 tablespoon oil. Add chicken and onion and cook until misture is just browned. Stir in beans and season with onion slat, suagar, garlic powder, pepper and oregano. Stir in condensed soup. Heat mixture, stirring constantly, until it just begins to simmer. Pour into pie crust and cover with top crust. Fold top crust under edge of bottom crust, seal and cut slits in top crust.
4. Bake in the preheated oven for 25 minutes or until golden brown.
Notes: I used my own pastry for this, the usual one I use that makes enough for a few pies. This time I mixed it in my Bosche and it was really hard to work, I won't do that again. I used frozen green beans and used onion powder and garlic salt instead. Hubby was raving about this pie and he loved it! It's a real tasty filling dish. I got this recipe from one of the Mom groups in town.[gallery]
Thursday, September 11, 2008
Applesauce Cookies

½ tsp. salt
1 tsp. cinnamon
½ tsp. nutmeg
½ tsp. cloves
1 c. applesauce
1 tsp. baking soda
½ c. soft margarine or butter
1 c. brown sugar
1 egg
1 c. seedless dark raisins
1 c. all bran buds
Sift first 5 ingredients together. Combine applesauce with baking soda. Mix margarine, sugar and egg until creamy. Mix in flour mixture alternately with applesauce. Fold in raisins and bran. Drop by tbs. 2 inches apart onto greased cookie sheet. Bake in a 350 F oven for 10-15 minutes.
I’ve had this recipe for over 10 years but I haven’t made them in quite awhile until recently when a friend reminded me about them. I can’t believe I forgot about them. They are the softest, moistest cookies and so yummy. I will add that I don’t add the last two ingredients in the list, I never have for some reason. They are just nice without them.

Saturday, September 06, 2008
Squashberry Jelly
Category: | Other |
Ingredients: |
|
Preparation: | Wash squashberries and place in a large pot. Add enough water so that it just covers hand when pressed on berries. Boil until berries are scalded. Strain through a colander. Measure juice and cook 4 cups (1 L) at a time. Cover and bring to a boil. Stir in 1cup (250 mL) sugar to each cup (250 mL) juice. Boil until small amount sheets off a metal spoon. Skim off froth and pour into hot sterilized jars and seal. |
Okay I have to tell you about this recipe. I followed the recipe exactly except for the last part about sheeting off the spoon, I wasn't even sure what that meant. I thought when the syrup like substance coated the spoon, so that is what I did. I did the whole boil my jars and lids, so I got that night sterile thing going. So that was all done and I just waited for it to set. The next day I was very aware that this was not going to set. So now I have four jars of squashberry syrup I guess. Oh well, failures do happen.


Monday, August 11, 2008
Berries...
A couple of weeks ago I went berry picking out in our back yard but after gettting back I realized that I really didn't know what I was picking, there seemed to be three different types of berries or rather 3 different kinds of trees, so i wanted to be sure, so I through that batch out.
[gallery]
I then got out my little berry book and started looking them up. I went out again yesterday and filled up a juice jug. What I picked was called squash berries and there is some discrepencies in where I look if they are high bush cranberries or not. Some say they are the same and some say they are not. So I'm not sure what I'll do with them. I'm thinking of trying a jelly but I need some jars. The process seems simple enough at the moment. There is a ton of bushes behind our house. I may try closer to the river next time as I saw some low bush cranberries there the last time I was out.
Tuesday, July 29, 2008
Gardening
Last night we had our first salad from the garden. Some nice romain, a bell pepper, green onion, broccoli and some baby tomatoes. The kids loved it except for the tomatoes, every one of them spit it out. I don't know why because they were sweet as can be.
This year the garden is doing very well, the boxes we moved across the street to the new house and the dirt was mixed up quite a bit so I think that helped with the one box that was having some issues last year and killed everything that was in that box.
So this year we have in the garden:
Swiss chard, Corn, peas, potates, beets, green onion, carrots, pole beans, romain and buttercruch lettus, broccoli, cauliflaurer, kale, cabbage (green and red), zucchini and kohlrabie which i have never grown before.
In the green house are the tomatoes, bell peppers, jalepeno peppers and cucumber. I've never grown the jalepenos before but the plant has about a dozen peppers on it and I'm not sure what I will do with it. I pick a couple last night and SmartGuy and I both just touched our tongues to a cut up piece and our mouths burned. Maybe I'll make some salsa. The pepper plants are flourishing this year compared to last, we've already had two peppers of it and a couple of plants have 6 or 7 peppers on each. They are small plants but I think the boxes maybe be small. I feel like I'll need more dirt next year and another box.
I'm not sure I will get much this years from the zucchini and cucumber plants, they were late starts and zucchini doesn't seem to do as well in the garden as they do in the green house. I'llhave to do some rearranging next year. I more or less just plopped the plants where they fit as I was busy with unpacking the house.
I haven't taken any pictures yet but I will this week and post them here.
Sunday, April 13, 2008
Thai Chicken Wrap


We ate at Nora's Kichen a few times this winter and hubby really loved this dish. Though her tortillas were much bigger than the ones I could find. I found the Sweet Red Chilli one day when parusing the small ethnic foods section at our store. I saw it and thought it looked like the dipping sauce we got with this dish served at the restaurant so I picked it up. It wasn't until a couple of weeks later I tried to make the dish.
It turned out pretty good actually. What my hubby calls 'squid guts', i know sounds appetizing doesn't it? I found some verecelli in the city when I was there in March. Yes, I was thinking in advance, I know I use my brains once in awhile. So it's pretty simple after that.
Tortillas
Sweet Red chilli
Vermecelli
Chicken breast, I cooked up some chopped up chicken breats
lettuce
cucumber and carrots, julienned
Put it all together in the amounts you like and wrap it up and voila. Thai Chicken Wrap. It's very good with cool or warm chicken. Enjoy!
Wednesday, April 09, 2008
A Simple Dessert
 Strawberries, sponge cakes and cool whip. You can spring some sugar on the chopped up berries beforehand and it'll create a syrup to put on the cakes. It's very simple, sweet and decadent.
Tuesday, April 01, 2008
Hello world!
Welcome to the new food blog. I'm still figuring things out but I'm really liking the new home for Not Just Cheesecake.
Tuesday, March 25, 2008
Easter Weekend.
 I was supposed to bring a dessert for the family Easter function and since I like making cakes. I did one and some cupcakes.
I got a two piece egg shaped pan and a cupcake decorating set the last time I was in the City and they came in handy this weekend.
The bismark tip was helpful in filling up the cupcakes, hubby did the filling for me. We just used vanilla pudding.


Buttercream Icing.

The flowers turned out alright, I didn't do well with the spiral top because the icing was too thick, not sure what I did there. The dots though take some practice.

I really have to learn to take my time or give myself time when doing cakes because I keep rushing through them and it ends up being sloppy. So I'm not impressed with my cake decorating right now. I need to practice more but honestly I eat the icing and the cake, so it's a no win for me caloriewise.
Thursday, March 20, 2008
I'm sorry I haven't been posting much lately and there is a reason. I haven't been cooking as much or trying out new recipes. I'm packing up my house, I'm tired from work and 3 kids. We move sometime next month and just the thought of cooking in this tiny kitchen now makes my heart stop when I think of the beautiful kitchen I'll have in a month or so. I will try better. I'm going to be doing some cooking this long weekend and making an egg shaped cake. So I will keep you posted and I promise once in my new kitchen I'll get back to it. Thanks for reading.
Thursday, March 06, 2008


My New Bosche!

I got it a few weeks ago. It was on sale becuase they were putting out a new model but I love this one. I haven't had much of a chance to use it lately but I will post a great bread recipe I made with it.
Tuesday, February 26, 2008

Vietnamese Salad Rolls

1 (8 ounce) package rice
vermicelli
8 ounces cooked, peeled
shrimp, cut in half lengthwise
8 rice wrappers (6.5 inch
diameter)
1 carrot, julienned
1 cup shredded lettuce
1/4 cup chopped fresh basil
1/2 cup hoisin sauce
water as needed
vermicelli
8 ounces cooked, peeled
shrimp, cut in half lengthwise
8 rice wrappers (6.5 inch
diameter)
1 carrot, julienned
1 cup shredded lettuce
1/4 cup chopped fresh basil
1/2 cup hoisin sauce
water as needed
DIRECTIONS:
1.
Bring a medium saucepan of water to boil. Remove from heat. Place rice vermicelli in boiling water, remove from heat, and let soak 3 to 5 minutes, until soft. Drain, and rinse with cold water.
2.
Fill a large bowl with hot water. Dip one rice wrapper in the hot water for 1 second to soften. Lay wrapper flat, and place desired amounts of noodles, shrimp, carrot, lettuce and basil in the center. Roll the edges of the wrapper slightly inward. Beginning at the bottom edge of wrapper, tightly wrap the ingredients. Repeat with remaining ingredients.
3.
In a small bowl, mix the hoisin sauce with water until desired consistency has been attained. Heat the mixture for a few seconds in the microwave.
4.
Serve the spring rolls with the warm dipping sauce.
These are really very good. I first tried these at craft night. Another crafter brought it and the recipe and served it with a peanut sauce which was nice. I tried this with the hoisin sauce and I liked it. It was sweet though. It's a recipe from Allrecipes.com. I only used canned shrimp and I had no fresh basil on hand and it was still yummy.
Cheesy Biscuit Crust - Pizza
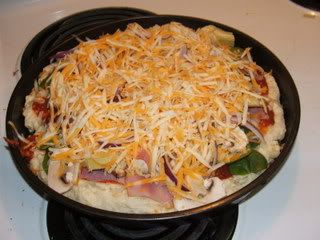
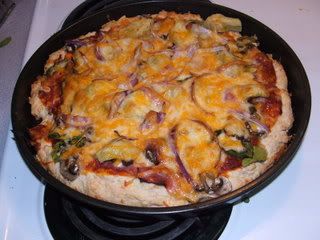
One thing that I love doing is making pizza from scratch. Nothing tastes quite the same as homemade pizza. For years I would buy the packages for making pizza where you open the packet and mix it with flour to make the crust. For awhile I did the Boboli ready made crusts. Then a friend of mine turned me on to this biscuit crust from the Pizza book by Company's Coming and I've been using it ever since. It's very yummy!
2c. flour
4 tsp. baking powder
4 tsp. granulated sugar
1/2 tsp. salt
6 tbs. hard margarine or butter
3/4c. milk
3/4c. grated sharp cheddar cheese
Measure first 5 ingredients inot a medium bowl. Cut in margarine until crumbly. Add milk and cheese. Stir together to form soft ball. Knead on lightly floured surface 8 times. Roll out and press inot greased 12 inch pizza pan, forming rim around edge.
Subscribe to:
Posts (Atom)

